
Amazon Integration
1.) Sign in to your dashboard. Reference: https://dashboard.cenports.com/login
2.) From the main dashboard, click Integration.

3.) Select Amazon Selling Partner.

4.) Once you select Amazon Selling Partner, on the right side, select Amazon.
a.) Fill in amazon.com to the Account ID field.
b.) Under Advanced Settings, make sure that in is_sandbox, select False.
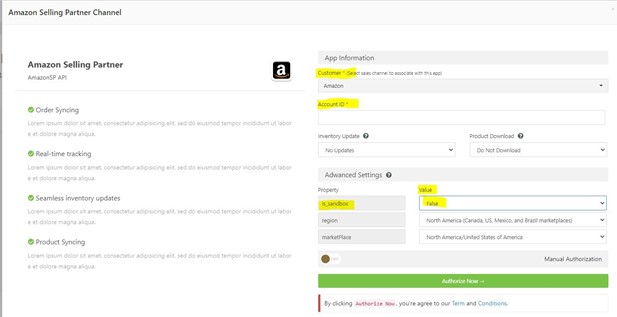
5.) Click Authorize Now. Once you click Authorize Now, it will redirect to your Amazon account. Take note that only the Seller Central Account Owner can perform the action.

6.) Once you sign in, there is an added layer of security to comply like OTP. Enter the OTP given in your account.

7.) The region and marketplace must match with the option user selected in Step 4.

8.) Make sure to check and Authorize Cenports (I direct Amazon to provide Cenports access to my Selling Partner account and related data etc.). Then click Confirm.

9.) This should complete the connection between Cenports and Amazon integration. Once done, please notify integrations@cenports.com to confirm the connection status.
